Virtual assistants have become an important part of our lives, simplifying tasks and enhancing productivity. Creating your own virtual assistant can seem like a complicated task, but with the right tools and framework, it’s entirely achievable. In this guide, we’ll walk through the process of developing a virtual assistant using NextGenSwitch, Wit.ai, and Laravel.
In this tutorial, we’ll guide you through building a chatbot designed to assist in managing loans. To give you a visual overview, here’s the flow diagram illustrating the steps involved in the loan management chatbot

Designing the Conversation Flow
In our scenario, the virtual assistant initiates the conversation with a greeting message and then engages in a dialogue with the customer to address their inquiries about pending dues. Here’s the conversation flow:
- Virtual Assistant Initialization:
- Virtual assistant sends a greeting message: “Hello Sir”.
- Waits for the customer’s response.
- Customer Interaction:
- Customer responds with “Hello or others”.
- Virtual assistant acknowledges the response and identifies itself: “Good morning, Sir! I am Ria talking from City Central Bank. Am I Talking with Mr. A?”.
- Virtual assistant waits for a confirmation from the customer.
- Handling Customer Confirmation:
- If the customer responds with “No”:
- Virtual assistant acknowledges the response: “Ok Sir, I will Call some other time. Thank you.”
- Conversation ends.
- If the customer responds with “Yes”:
- Virtual assistant informs the customer about any pending dues: “Sir, you have an EMI due amount forty-five thousand. Can you please confirm the money is available in your account?”.
- Waits for confirmation or denial from the customer.
- If the customer responds with “No”:
- Handling Customer’s Response to Pending Dues:
- If the customer confirms availability of funds:
- Virtual assistant acknowledges the confirmation: “Ok, Sir thanks for your confirmation.”
- Conversation ends.
- If the customer denies availability of funds:
- Virtual assistant asks for the expected availability date: “Can you please tell me when the money will be available in your account? Today, tomorrow, or some other day?”.
- Waits for the customer’s response.
- If the customer confirms availability of funds:
- Handling Expected Availability Date:
- Customer responds with the expected date.
- Virtual assistant acknowledges the response: “Thanks for your confirmation, Sir. Have a good day!”.
- Conversation ends.
Please check the recorded audio below
To begin building our virtual assistant with Laravel, let’s create a new Laravel project. Laravel provides a convenient command-line tool, Composer, to create new projects effortlessly.
Open your terminal or command prompt.
Depending on your operating system, open your terminal or command prompt. Ensure you have Composer installed globally on your system. If not, you can download and install Composer from getcomposer.org.
Create a new Laravel project:
Use Composer to create a new Laravel project. Run the following command:
composer create-project --prefer-dist laravel/laravel virtual-assistantThis command will create a new Laravel project named “virtual-assistant” in a directory named “virtual-assistant” within your current location. It fetches the latest version of Laravel from Packagist and installs it along with its dependencies.
Navigate to the project directory
Once the project is created, navigate to the project directory using the following command:
cd virtual-assistantVerify installation (optional)
You can verify that the installation was successful by running the development server. Execute the following command:
php artisan serveThis command starts a development server at http://localhost:8000, allowing you to access the default Laravel welcome page in your web browser.
Congratulations! You’ve successfully created a new Laravel project. Now, we can proceed with integrating NextGenSwitch and building our virtual assistant.
Integrating NextGenSwitch
NextGenSwitch is a powerful tool that facilitates communication between your Laravel application and various services, including voice-based interactions. In this step, we’ll integrate NextGenSwitch into our Laravel project.
Install NextGenSwitch Package
Use Composer to install the NextGenSwitch PHP package. Run the following command in your terminal:
composer require nextgenswitch/nextgenswitch-php @devImplementation
Before delving into the code implementation, it’s essential to understand the key functionalities of NextGenSwitch and Wit.ai.
NextGenSwitch:
- NextGenSwitch facilitates voice-based interactions between users and applications.
- The VoiceResponse class is utilized for handling voice-related functionalities, such as saying text to customers.
- It enables gathering customer voice responses and converting them to text.
- Additionally, it can play voice messages to users.
- In this scenario, we’ll primarily focus on using two methods:
sayfor delivering voice messages andgatherfor capturing customer responses.
Wit.ai:
- Wit.ai is a powerful natural language processing platform.
- It assists applications in understanding and interpreting human language inputs.
- Developers can utilize Wit.ai to analyze user inputs and extract intents and entities from text.
- However, for our scenario, we’ll primary intention NextGenSwitch for voice interactions and Wit.ai for natural language understanding.
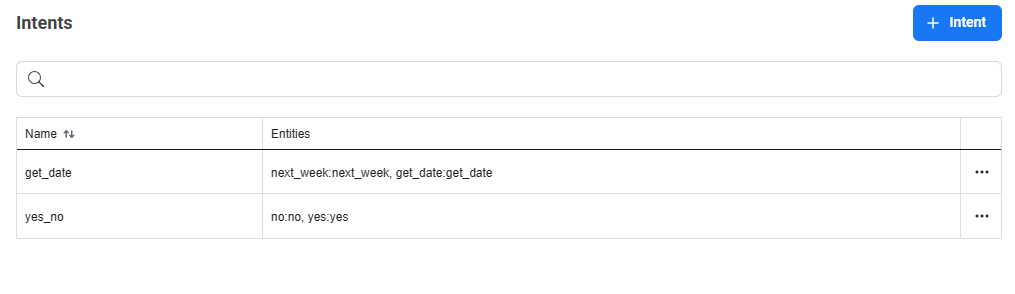
In this scenario, you’ve defined two intents: “get_date” and “yes_no”, along with some entities. Let’s understand how these intents and entities are structured and their role in the conversation flow.
- Intents:
- get_date: This intent is triggered when the virtual assistant needs to gather information about a specific date from the customer. For example, when asking the customer when the money will be available in their account.
- yes_no: This intent is triggered when the virtual assistant needs to confirm or deny something with the customer. For example, when confirming if the customer’s name is correct or if funds are available in their account.
- Entities:
- Entities are parameters or variables that provide context to the intent. In your scenario, you might have defined entities such as “yes” or “today” to extract specific information from the customer’s response.
- Conversation Flow:
- When the customer interacts with the virtual assistant, their responses are analysed by Wit.ai to determine the intent and extract relevant entities.
- For example, if the customer responds with “yes” to a confirmation question, the “yes_no” intent is triggered, and the virtual assistant proceeds accordingly.
- Similarly, if the customer responds with a specific date in the context of availability, the “get_date” intent is triggered, and the virtual assistant captures the date for further processing.
Here is the sample code of the virtual voice assistant.
<?php
use Illuminate\Http\Request;
use Illuminate\Support\Facades\Route;
use NextGenSwitch\VoiceResponse;
Route::post('/', function(){
    $response = getVoices();
    return $response;

})->name('home');
Route::post('/hello', function(){
    return getVoices('hello');

})->name('hello');
Route::post('/yes_no', function(Request $request){

    if($request->input('speech_result') != ''){

        $response = getWitIntent($request->input('speech_result'));

        if(isset($response["entity"]) && $response["entity"]['name'] == "no"){
            return getVoices('yes_no_no');
        }else{
           return getVoices('yes_no_yes');
        }

    }else{
        $voice_response->say("can not understand sir ");
        return route('hello');
    }


})->name('yes_no');
Route::post('/get_date', function(Request $request){

    if($request->input('speech_result') != ''){
        return getVoices('get_date');
    }else{
        return getVoices('get_avaialable_yes');
    }
})->name('get_date');
Route::post('/get_avaialable', function(Request $request){

    if($request->input('speech_result') != ''){
        $response = getWitIntent($request->input('speech_result'));
         if(isset($response["entity"]) && $response["entity"]['name'] == "yes"){
            return getVoices('get_avaialable_yes');
         }else{
            return getVoices('get_avaialable_no');
         }
    }else{
       return getVoices('yes_no_yes');
    }

})->name('get_avaialable');
function getVoices($action = ''){

    $voice_response = new VoiceResponse();

    if(empty($action)){
         $gather = $voice_response->gather(['input'=>'speech','transcript'=>false,'action'=>route('hello')]);
        $gather->say("Hello Sir !!");
    }elseif($action == 'hello'){
        $voice_response->say("Good morning Sir ! I am Ria talking from City Central Bank.");
        $voice_response->say("Am I Talking with");
        $gather = $voice_response->gather(['input'=>'speech','action'=>route('yes_no')]);
        $gather->say("Mr. Khairul Alam");
    }elseif($action == 'get_avaialable_yes'){
        $voice_response->say("Ok, Sir thanks for your confirmation .");
    }elseif($action == 'get_avaialable_no'){
        $voice_response->say("Can you please tell me when the  money will be available in your account ?");
        $gather = $voice_response->gather(['input'=>'speech','action'=>route('get_date')]);
        $gather->say("Today , tomorrow or some other days ?");
    }elseif($action == 'yes_no_yes'){
        $voice_response->say("Sir, You have an E M I due amount fourty five thousand .");
        $gather = $voice_response->gather(['input'=>'speech','action'=>route('get_avaialable')]);
        $gather->say("Can you please confirm the money is available in your account ?");
    }elseif($action == 'yes_no_no'){
        $voice_response->say("Ok Sir, I will Call some other time . Thank you.");
    }elseif($action == 'get_date')
        $voice_response->say("Thanks for your confirmation Sir. Have a good day ! ");
    return   $voice_response->xml();
}
function getWitIntent($text){

    define('BARIER_KEY','ONUSS24K2F3JPI4SAQVQYNI5CCKNUXV6');

    $url = 'https://api.wit.ai/message';
     $params = [
        'v' =>'20240311',
        'q' => $text,
    ];
    $queryString = http_build_query($params);
    $ch = curl_init();
    curl_setopt($ch, CURLOPT_URL, $url . '?' . $queryString);
    curl_setopt($ch, CURLOPT_RETURNTRANSFER, true);
    $headers = [
        'Authorization: Bearer ' . BARIER_KEY,
        'Content-Type: application/json',
    ];
    curl_setopt($ch, CURLOPT_HTTPHEADER, $headers);
    $response = curl_exec($ch);
    $data = array();
    if (curl_errno($ch))
        return false;
    curl_close($ch);
    $response =  json_decode($response, true);


    /*
    if( count($response['intents']) == 0){
        return false;
    }
    */
    if( count($response['intents']) > 0){
        $data['intent'] = $response['intents'][0]['name'];
    }
    if(count($response['entities']) > 0){
        $expected_entities = $response['entities'][array_key_first($response['entities'])];
        $entity = $expected_entities[array_key_first($expected_entities)];
        $data['entity'] = [
            'name' => $entity['name'],
            'value' => $entity['value']
        ];
    }
    return $data;
}
Let’s break down the provided code:
Routes: There are several routes to handle different interactions with the virtual assistant. They only accept POST requests.
- Route
/:- Calls the
getVoices()function and returns the response.
- Calls the
- Route
/hello:- Calls the
getVoices('hello')function and returns the response.
- Calls the
- Route
/yes_no:- Uses the
getWitIntent()function to analyze the customer’s response and determine the intent. - Based on the intent, returns a response using the
getVoices()function.
- Uses the
- Route
/get_date:- Calls the
getVoices('get_date')function and returns the response.
- Calls the
- Route
/get_available:- Uses the
getWitIntent()function to analyze the customer’s response and determine the intent. - Returns a response using the
getVoices()function based on the intent.
- Uses the
Function getWitIntent($text):
- Sends the customer’s text input to Wit.ai for analysis.
- Parses the response to extract the detected intent and entity.
- Returns the detected intent and entity as an associative array.
Function getVoices($action = ''):
The getVoices($action = '') function generates voice responses based on the provided action parameter, which represents different scenarios in the virtual assistant’s interaction flow.
- If no action is specified, it initiates a speech gathering action to prompt the user with “Hello Sir !!”.
- If the action is ‘hello’, it delivers a greeting followed by a query asking if the user is present.
- Depending on the provided action, it generates various responses to specific scenarios, such as confirming information, asking questions, or providing instructions.
- The function constructs these responses using the
VoiceResponseclass, incorporating spoken messages and gathering actions for user input. - Finally, it returns the XML representation of the generated voice response.
$voice_response->say("Good morning Sir ! I am Ria talking from City Central Bank.");
$voice_response->say("Am I Talking with");
$gather = $voice_response->gather(['input'=>'speech','action'=>route('yes_no')]);
$gather->say("Mr. Khairul Alam");
this code segment initiates a conversation by providing the user with a greeting, asking a question, and enabling the assistant to listen for the user’s response. Once the user finishes speaking, their response is sent to the ‘yes_no’ route for further processing.
Host Laravel Project
Use Ngrok or any other method to host your Laravel project live.
To Live your local Laravel project via Ngrok:
- Download and install Ngrok
- Open a terminal and run the following command.
ngrok http http://localhost:8000- (replace 8000 with your Laravel project’s port).
- Access your project using the provided Ngrok forwarding URL
Testing
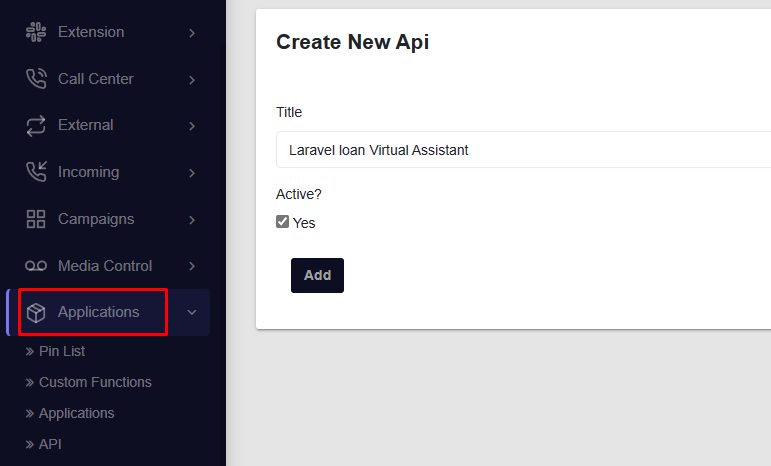
Now it’s time to proceed with testing. We have several testing methods available, one of which involves testing through an API. To set up the API for testing, follow these steps:
- Navigate to “Applications” > “API” and create a new api in your dashboard.
- Enter a name for your API and ensure the “Active” checkbox is selected.
- After creating the API, you’ll receive an API key and secret. Make sure to copy and store these securely, as they cannot be retrieved later.
After setting up the API, we’ll define a route “/send-call” and write the following code to initiate a call:
Route::get('send-call', function(){
    $client = new CurlClient();
    $response = $client->request('post', 'http://your-pbx-url/api/v1/call', [], [
        'to' => '01518307641',
        'from' => '5002',
        'response' => https://6734-103-86-196-156.ngrok-free.app
    ], [
        'X-Authorization' => 'RWopQ05OeelxJ6K526gPr.....',
        'X-Authorization-Secret' => 'wZHEJvcrCiFbWP.....'
    ]);

    if($response->ok()){
        echo "<pre>";
        print_r($response->getContent());
        echo "</pre>";
    } else {
        echo $response;
    }
});
- ‘to’ specifies the recipient’s phone number.
- ‘from’ specifies the caller’s number.
- ‘response’ specifies the URL of the virtual assistant’s starting point.
The request is authenticated using the provided API key and secret. If the call request is successful, it prints the response content; otherwise, it echoes the response.
Another testing method involves utilizing custom functions. Let’s walk through the process step by step.
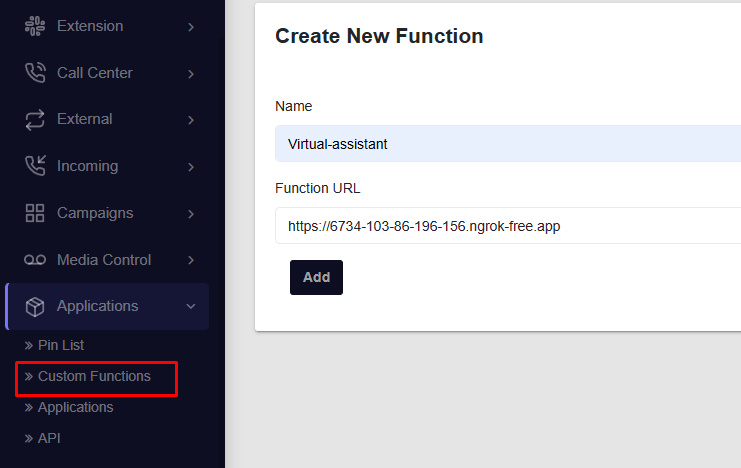
- Create Custom Function: Navigate to NextGenSwitch’s dashboard, go to “Application” > “Custom Functions”, and create a new custom function. Define the function’s name and provide the Ngrok URL or live server URL as the function’s endpoint.
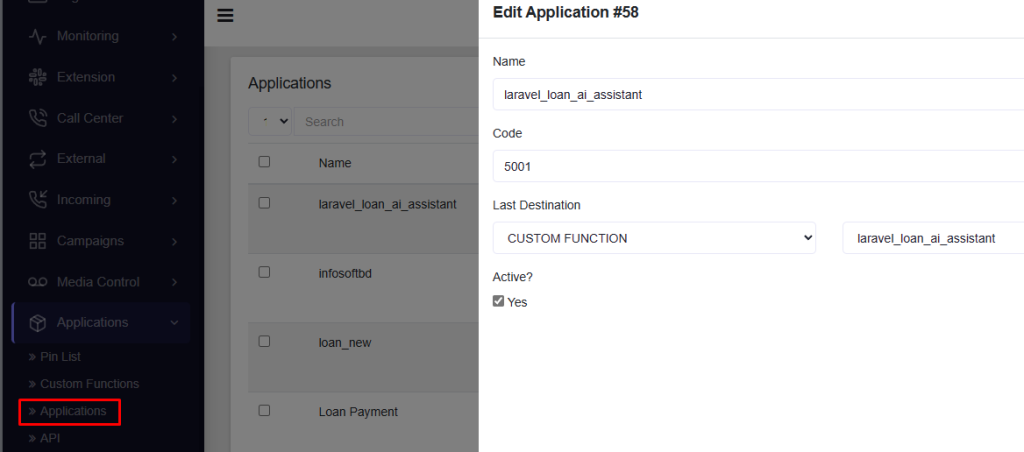
- Create Application: Next, go to “Applications” > “Applications” and create a new application. Fill in the required fields such as name, code, destination module, and destination. For the destination module, select “CUSTOM FUNCTION”, and for the destination, enter the name of the custom function created earlier.
- Call Extension Code: After creating the application, you can call the extension code within your project to interact with the virtual voice assistant through NextGenSwitch.
Following these steps will allow you to effectively test your Laravel project’s integration with NextGenSwitch by interacting with the virtual voice assistant.
Necessary files and links
To access a demo of NextGenSwitch, please visit our website NextGenSwitch.